
Uses:
- Front Desk Attendants
- Bulk Call Routing
1. Signing in to Calling User Portal
The Receptionist Client can be reached within the Calling User Portal. To access, go to settings.webex.com and select the Webex Calling tab. You are routed to the Calling User Portal. See detailed steps for accessing the Calling User Portal here.
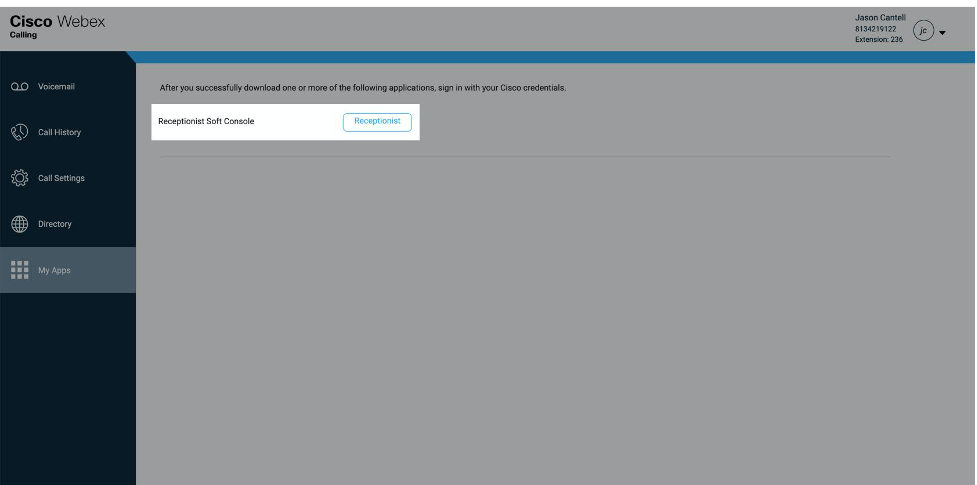
- From the Call User Dashboard, click on the My Apps tab.
- Then click the Receptionist Client (Receptionist Client).
Signing in to the Receptionist Console
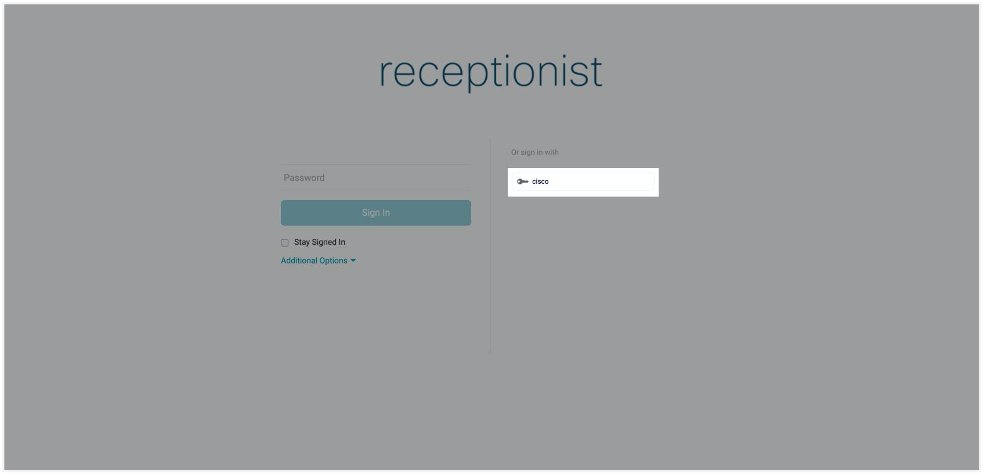
1. After cross-launching from the Calling User Portal, you can log into the Receptionist Soft Console by click on the Cisco option here. This will sign you in by automatically using your sign in to the Calling User Portal.
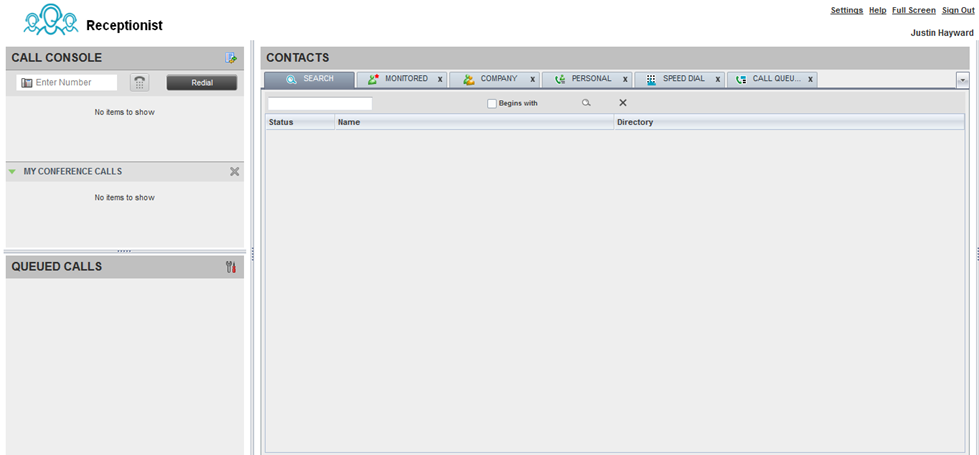
2. Display Pane
The Display Pane contains global messages, application settings, and information about your user account and call state.

The Global Message area, in the center area of the Display Pane, is used to display incoming call information, warnings, and error messages. When an event occurs, a message appears for several seconds.

- To view and change your current settings, click the Settings link. You’ll see a page with tabs across the top. These tabs contain various setting associated with your account.
- To return to the main page, click Back to Application.

Your current line status appears with an icon next to your name. Only one line state icon will appear. Do Not Disturb has the highest service presence, followed by Call Forwarding Always, then Busy. If no services are enabled and your phone state is Idle, an icon will not appear.
The different icons are:


To enable or disable Do Not Disturb or Call Forwarding Always:
- At the top-right of the main page, click Settings.
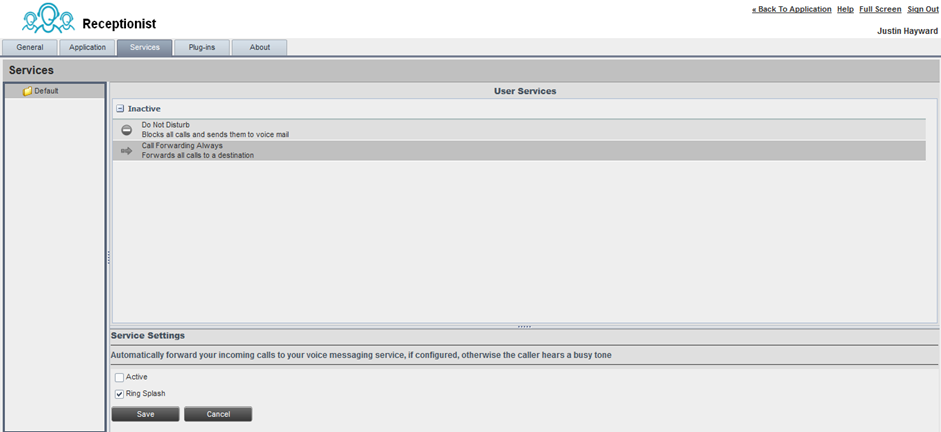
- Click the Services tab.
- Select the service you want to enable or disable, and check or uncheck the Active box.
- If you checked the Active box for Call Forwarding Always, in the Forward To text box, enter the phone number to forward your call to. Also, check the Ring Splash box if you want to be notified by a short ring that a call came in and was forwarded.
- Click Save.
3. Contacts Pane
The Contacts Pane contains your contact directories and allows you to use your contacts to make calls. For information about how to use your contacts to make calls, see the Managing Contacts article.
- Click a tab to show its contacts, and then click the contact to expand and display contact information.
- To collapse a contact, click it again.
The Contacts Pane contains the following tabs which expand into panels when you click them:
- Search – Enables you to search for contacts in any of your directories.
- Favorites – Lets you monitor the call status of selected contacts. The contacts you monitor must be configured in the web portal.
- Company or Enterprise – Displays all the contacts with in your company or organization.
- Personal (directory) – Enables you to view, add and edit any of your personal contacts.
- Speed Dial – Enables you to view add and edit your speed dial list.
- Call Queues – Displays a list of all the call center queues and DNIS numbers where you’ve been assigned.
- Custom Contacts – View directories your administrator may have created that has a specific set of users.
- Outlook – Displays all of your Outlook contacts when you have Outlook integration enabled.
- Directories – Enables you to filter on any of your main contact directories.
To quickly find your frequent contacts in a specific directory, select Show All, and then move the directories you use most to the Call Console.
4. Call Console
You can use the Call Console to view and manage your current calls. For more information about managing calls, see the Manage Calls article.
This Call Console header contains these buttons:
- Call Trace – Run a call trace on the last inbound calls.
- Auto Answer – Automatically answer new incoming calls when you’re available to receive calls (designed for agents wearing headsets).
- Call History – Access your call history list which is categorized by missed, placed, and received calls.
- Dialer – Enter a number and then click Dial to make a call.
- Redial – Redial recently placed calls by clicking this button and then selecting the number you want.

The Call Console also contains the My Conference Calls pane, which shows each participant in an active multi-party conference call you started. While you’re on an active conference call, the header contains these controls that let you manage the conference:
- End conference – End the current conference for all parties.
- Leave conference – Leave the conference but let the other two parties continue on the call.
- Hold conference – Put the entire conference call on hold.Answer conference – Resume the conference call you previously placed on hold.
- Answer conference – Resume the conference call you previously placed on hold.
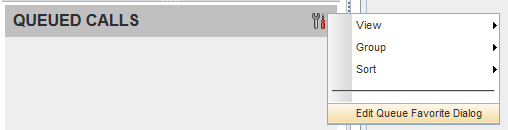
5. Queued Calls Pane
You can use the Queued Calls Pane to monitor and manage queued calls.
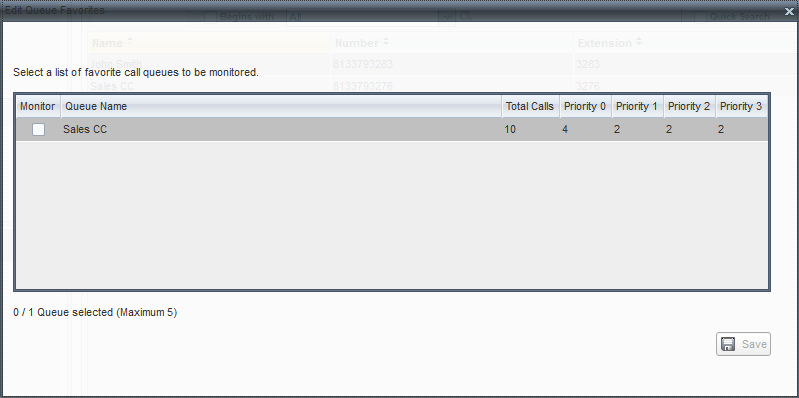
- To select the queues you want to show in the panel, click the tools icon, and then click Edit Queue Favorite Dialogue.
- You can select which queues you want to show in the panel and select how many individual calls you want to show on the screen. You can display information for up to 5 queues at a time, but can change which queues you show at any time.
- Within each queue you can see what service mode is active and real-time information
about how many calls are currently queued in that call center. - You can also view and manage individual queued calls. You can retrieve calls from the
queue, reorder, and promote calls within queues. You can also see how long an
individual call has been queued.
Copyright© 2018 Cisco Systems, Inc. All rights reserved.
Recent Comments